


This tutorial is intended for people who already know how to make cuffs, but don't understand how to follow patterns.
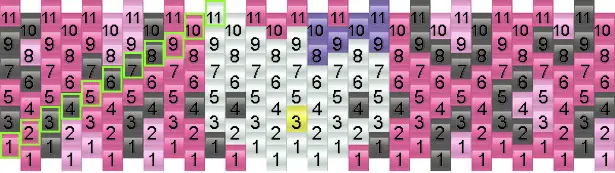
This brief tutorial will attempt to explain how to follow kandi patterns like this one:
These types of patterns are referred to as: peyote bead patterns, peyote stitch patterns, brick stitch patterns, and multi stitch patterns.
For the full tutorial on how to make a cuff from this pattern, please go here: Hello Kitty Cuff Tutorial. This is just intended to be a supplement, or a quick tutorial for people who already know how to make cuffs.
This tutorial assumes that you make your cuffs in the same way that the tutorial above describes - without tying off after every row. If you tie off after each row, it will not work for you.
So, let's get started!
When I say row, I mean the beads that are going horizontally across the cuff, and are all the same number.
When I say column, I mean the beads that are going vertically up the cuff, e.g. "1, 2, 4, 6, 8, 11."
With the pattern above, all the beads labeled 1 are the 1st row, all the beads labeled 2 are the 2nd row, all the beads labeled 3 are the 3rd row, etc.
You will notice that the first row has 30 beads, and the others only have 15. This is because the base of this bracelet - which is basically a single-stranded kandi bracelet - is intended to be 30 beads around. If you wanted it to be wider, you could add on an even number of columns. You could also make it thinner by removing an even number of columns.
You start out with row 1, then string row 2, then row 3 etc, all the way up to 11, stringing the beads from left to right - creating the cuff layer by layer. This is the order you'll string beads for row 1:
![]()
And this is the order you'll string beads in for row 2:
![]()
Seems pretty self explanatory, right? If you read across the pattern, you'll see that all the beads labeled 1 go in that order, and all the beads labeled 2 go in that order.
BUT, there's a catch:
As you work your way up the layers, you will NOT always start at the first bead in the pattern. The bead number you start at will increase as you work up. The bead you start at is outlined in green on the pattern above.
For row 3, you will start at the 2nd bead in the row, and continue like this:

What you are doing is starting at the 2nd bead of the pattern, stringing the others in order, and then adding on the first bead that you skipped.
For row 4, you will also start at the 2nd bead in the row (black) and continue like this:

Again, you're starting at the 2nd bead, but then adding on the first bead that you skipped.
Click on the thumbnail below to download a PDF file of what beads to start at for each row. This will help you understand how to follow the pattern.
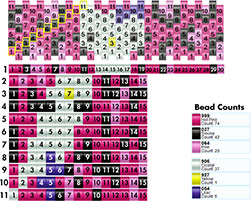
Looking at the PDF file, you'll see that with row 5, you now start at the 3rd bead in the row. Below is a chart of how the bead you start at changes as you work your way up:
| Row | Start at bead # | Row | Start at bead # |
| 1 | 1 | 11 | 6 |
| 2 | 1 | 12 | 6 |
| 3 | 2 | 13 | 7 |
| 4 | 2 | 14 | 7 |
| 5 | 3 | 15 | 8 |
| 6 | 3 | 16 | 8 |
| 7 | 4 | 17 | 9 |
| 8 | 4 | 18 | 9 |
| 9 | 5 | 19 | 10 |
| 10 | 5 | 20 | 10 |
So for row 5, the beads you'd string are these:
![]()
With row 5, you start stringing from the 3rd bead, continue your way along the row, then add on the 2 beads you skipped at the beginning of the row.
Same for row 6.
With row 7, you start stringing from the 4th bead, continue your way along the row, then add on the 3 beads you skipped at the beginning of the row.
Same for row 8.
Hopefully you get the idea here. You can apply the chart above to any pattern on the site, as long as you make cuffs in the way that this site describes. As you make the cuff, be sure to refer back to the pattern after every row. That way you'll notice if you made a mistake before you get too far along.
