


 |
This kandi tutorial will teach you how to make a 3D pokeball. Supplies needed: 29 red pony beads, 19 black pony beads, 32 white pony beads, elasticated string, scissors. (let me know if these bead counts are off) Basic idea: You will be making a tiny multi-stitch cuff that's tapered in on both ends. Be sure to pull tighter than you do with bracelets. CellularMango made a video tutorial for this: Part 1, Part 2 |
|
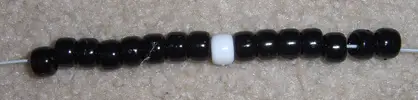
Start out by stringing 16 beads onto a long piece of string in the order shown: |
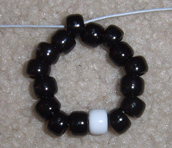 |
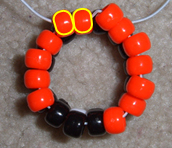
Then pull the right end of the string through the far left bead, forming a circle shape. Leave an even amount of string on the left and right sides. |
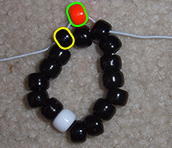 |
Add a red bead to your string, then skip a bead and pull through a black bead as shown. Pull tightly. For this entire row we will be skipping one bead each time, just like you do when making a multi-stitch cuff. |
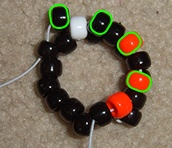 |
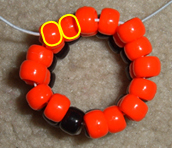
String two more red beads, followed by two black beads (these two black beads are to form the center of the pokeball). Remember to skip a bead each time, and pull tightly. |
 |
String three more red beads, then to complete the row pull up through a black bead and a red bead as shown. |
 |
Red Row 1 For red row 1 you will string all red beads, apart from one black bead that will go over the top of the white bead. At the end of the row, pull up through two red beads as shown. Skip a bead each time and pull tightly. |
 |
Red Row 2 For row 2 you will be stringing all red beads - 8 beads total. Skip a bead each time and pull tightly. At the end of the row, pull up through two red beads. |
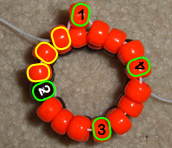 |
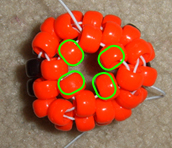
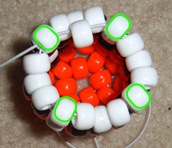
Red Row 3 For row 3, you will string all red beads, but only 4 of them; you will skip more than one bead each time. String the first bead (1), then pull through three beads (outlined in yellow). Then string a red bead, and place it over the black bead labeled 2, and pull through 3 beads. Then place a red bead in position (3), pull through the next three red beads, and place a bead in position (4). To end the row, pull up through three beads, and then also through the bead labeled 1. |
 |
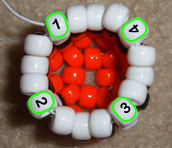
Your string should now be coming out of bead 1. Stop here and note that we now have four beads that are higher than all the others. These are the new corner points for the last red row. There should be three beads between each corner point. |
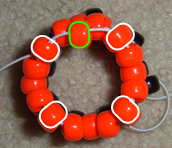 |
Red Row 4 For the last red row we will once again only be stringing 4 beads. String a red bead (outlined in green), and pull through the next corner bead (corner beads are outlined in white). Repeat this process with three more red beads. Pull tightly. |
 |
The bottom of your ball should now look like this (new beads outlined in green). The beads will be pretty loose at this point but we will worry about tightening them up at the end. |
| Flip your ball upside down. We're now going to repeat the same process we did for the white half, but with red beads instead. We'll do two rows where we string 8 beads and skip a bead like with normal multis. Then two rows where we string 4 beads and then skip 3 beads. | |
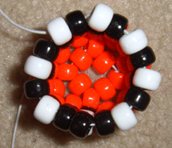 |
White Row 1 For this row you will be stringing all white beads, apart from one black bead to close in the circle for the pokeball center. Skip one bead each time, and pull up through two beads to complete the row. Pull tightly. |
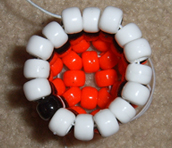 |
White Row 2 For row 8 you will be stringing all white beads - 8 beads total. Skip one bead each time and pull tightly. At the end of the row, pull up through two white beads. |
 |
White Row 3 For this row you'll be adding 4 white beads (the ones outlined in green). After each new bead you add, pull through three more, like you did for Red Row 3. To finish the row, pull through four beads (three beads plus the first new white bead you added on this row - bead 1). |
 |
White Row 4 For the last white row, you'll string 4 beads - one between each corner point outlined in green. Pull tightly after adding each bead.
|
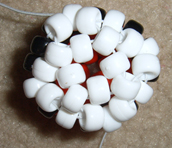 |
After adding all four beads and pulling tightly, the bottom of your ball should look like this. Flip your ball over to the red side and pull the string tightly/weave it through nearby beads so that it also looks like this. |
|
If you want to tie off the ball, work each end of the string through nearby beads until they meet, and then tie them in a knot. If you want to turn this into a bracelet, work each end of the string through some nearby beads to tighten the beads up, then add more beads to each side of the string, and tie the ends together in a knot. |
If you have specific questions about this tutorial (not just "I don't understand any of it") please use my contact form to ask, and I will revise the parts you find confusing

