Viewing page 1 of 4
part

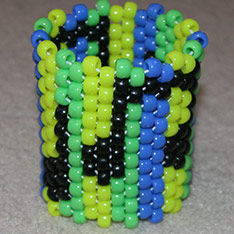
Are you looking for: "How to tie more string onto kandi?", "How to tie off kandi?" or "How to tie stuffed animals onto cuffs?"

How to make kandi cuffs from patterns


I have a new tutorial that is easier to follow than this one. See it here: http://kandipatterns.com/kandi-tutorials/hello-kitty-cuff-tutorial

final.jpg
This tutorial will attempt to teach you how to make a multi-stitch kandi cuff like the one above, as well as how to read kandi patterns like the ones from this site. This is the way that I personally make cuffs, and I know that some of you may use an easier method, but this is the one I prefer.

This tutorial is very detailed, which also means that some of it is repetitive. You can use the outline or other links placed within the tutorial to skip ahead if needed.You may also need to refer to the Adding on string if you run out before you get to it in the tutorial. Please do not post this tutorial on other websites, but you may link to it.

This is the pattern we are going to make. You can use different colors if you want, obviously. I chose this pattern because the vertical lines make it easy to tell if you have misplaced a bead.tutorialpattern.gif


Basics of following patterns

The pattern above is for a cuff that's 34 beads around. Each numbered layer is a layer of the cuff. You'll notice that the first two rows of the pattern are both labeled "1." That's because when you start making your cuff, the first layer (which will just be a single stranded bracelet) will be composed of both of the "1" rows. It has to be this way so the single stranded bracelet will be 34 beads around, not 17. You read the pattern from bottom to top (the columns), and left to right (the rows). However, as you work your way up the rows, you will not always start at the first bead in the row. If you make your cuffs in the exact same way as this tutorial, and your pattern has an even # of beads (like all the patterns on this site) this is the pattern your starting beads should follow:
Row Start at bead # Row Start at bead #
1 1 11 6
2 1 12 6
3 2 13 7
4 2 14 7
5 3 15 8
6 3 16 8
7 4 17 9
8 4 18 9
9 5 19 10
10 5 20 10


Hopefully you can see how the pattern goes from there. But you shouldn't rely entirely on this chart, because it may not work for all patterns, and it definitely doesn't work if you make the cuff in a different way. You should keep checking your cuff with the pattern to make sure you're on track. Let's get started making the cuff (directions will appear above each photo).

Here I laid out all of the beads that are going to make up the first row of the cuff. If this is your first cuff, you should lay out the beads like this to make it easier. And if you compare these with the pattern, it will help you understand how to read the first row.

1.jpg


Cut a long piece of string, as long as you are comfortable working with. If you run out, you can tie more on later; see Adding on string if you run out. Now thread the beads from left to right. Once they're on the string, make sure that the longest section of the string is to the right, and that there are a few inches left over to the left. This left section is what will be labeled "end" throughout the tutorial, and you won't thread it through beads until the very end. All you'll do until then is pull it occasionally to tighten the cuff.

2.jpg


Take the long end of the string (not the "end"), and thread it through the first bead on the left (the yellow one).
3.jpg


Pull it tightly, until the beads come close together. They will come looser as you add more beads, so you'll need to keep pulling both ends of the cuff to tighten it. You've now completed row 1 (the base of the cuff)!4.jpg


Starting the 2nd row
Check the pattern or photo of the beads laid out, and you'll see that the first bead of the 2nd row is a yellow one. Thread the yellow bead onto the string, then skip over the next bead and go through the green bead labeled below. As you continue to thread new beads for the rest of the cuff, you will always skip one bead. Never thread through the bead that's next to where your string comes out.
5.jpg


The second bead of the 2nd row is a green one. Place it onto your string, skip a bead, and pull it through the blue bead labeled below.
6.jpg


The third bead of the 2nd row is a blue one. Place it onto your string, skip a bead, and pull it through the yellow bead labeled below.
7.jpg


As you can tell, this is a very repetitive stitch. Continue adding beads in this way. When you get to about the 5th bead, your cuff should start to stand up. If it doesn't, you haven't been pulling hard enough. This means that when your cuff is finished, it will be more loose/stretchy rather than tight and stiff. In my opinion you want it to start out tight and stiff, because it will stretch out over time.

8.jpg


Finishing the 2nd row
When you come to the end of each row, you will still skip a bead, but you'll also have to pull through two beads rather than just one. The last bead of the 2nd row is a green one. Place it onto the string, skip a bead, and pull it through the yellow beads shown below. Note that you are pulling it through two yellow beads. If you have been pulling tight, the 2nd bead you pull it through will be raised higher than the 1st bead, as you can tell from the photo.
9.jpg


Pull tightly, and you're finished with the 2nd row!

10.jpg


Be sure to compare your cuff with the pattern to make sure all the beads are in place.