


| part |
|---|
Turning your cuff into a 3D cuff!This tutorial will teach you how to turn your base cuff into a 3D cuff. You can learn how to make the base cuff from my kandi cuff tutorial. If you run out of string, click here to learn how to tie more on. 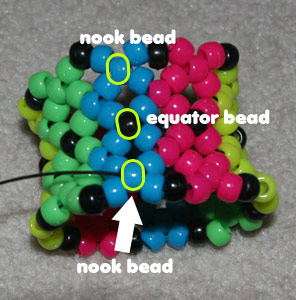 Step 1:Thread your string along until it is coming out of the hole outlined in green. See how this bead is in the nook in between two 3-bead segments along the edge of the cuff? We'll call all beads in this position the nook bead. The black beads going around the center of the cuff will be called equator beads (reference to the equator of the Earth) 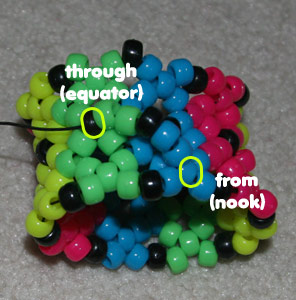 Step 2:5-bead diagonal row 1 When we were making the base cuff, we only added 3 beads at a time. But when we turn the base cuff into a 3D, we will sometimes be adding 5 beads at a time, and sometimes 2 beads at a time. For the first 3D row, we will put on five beads at a time. The first two beads should match the color bead you're coming from, the middle bead should be black, and the second two beads should match the beads near the bead you're pulling through, and in this case, the surrounding beads are green. By that logic, the beads I put on are blue, blue, black, green, green. Pull tightly. 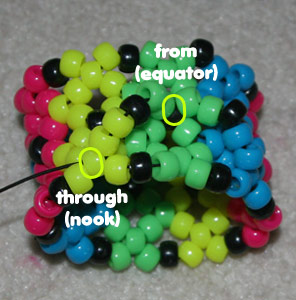 Step 3:Now for the rest of the row we basically alternate between coming from an equator bead and through a nook bead, and from a nook bead and through an equator bead. Stringing five beads each time. The next five beads we string are green, green, black, yellow, yellow (following the color rule mentioned previously). And because I'm coming from an equator bead, I have to string through a nook bead. Pull tightly. 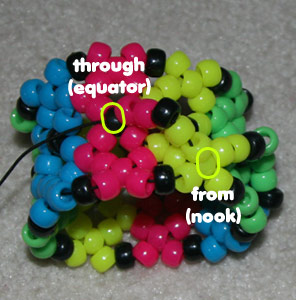 Step 4:The next five beads we string are yellow, yellow, black, pink, pink, and we are coming from a nook bead, so we have to string through an equator bead. Pull tightly. Your 3D segments should be standing up a bit already.  Step 5:The next five beads we string are pink, pink, black, blue, blue. We're coming from an equator bead and going through a nook bead. Finish the rest of the row, remembering the rules below: From nook -> through equator Colors: 2x the color bead you're coming from (or the surrounding bead color, if the bead is black), 1x black, 2x the color bead you're going through (or the surrounding bead color, if the bead is black)  Step 6:When you get to the end of the row, your string should be coming through a nook bead. Our next step is to turn these 3D diagonal segments into Xs. This will involve stringing 2 beads at a time. We first need to work our string over so that it's coming through a black sticking-up bead. The path we need to take is outlined with a white arrow.  Step 7:Now the string is coming out through the black bead. For the next few steps what we do might seem odd, but once you see the later photos it will make sense, so skip ahead if necessary :) We're basically trying to turn the diagonal strips of beads into Xs/ pyramids by adding two beads at a time. 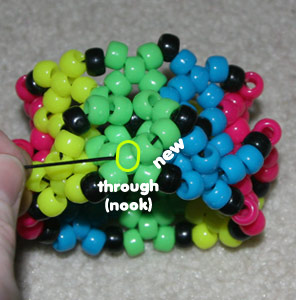 Step 8:Add two green beads, and string through the closest nook bead as shown. 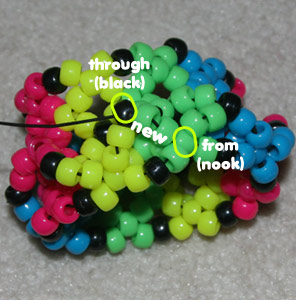 Step 9:Add another two green beads, and string through the nearest black bead that's sticking up. 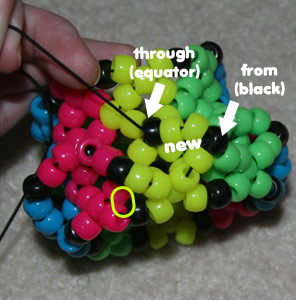 Step 10:Add two yellow beads, and string through the nearest black equator bead (remember, the equator beads are the black beads that go around the center of the cuff). Pull tightly. By now you should see that we have made an X shape or pyramid shape. The black bead that's sticking up is the center of the X/pyramid, half of the pyramid is yellow and half is green. 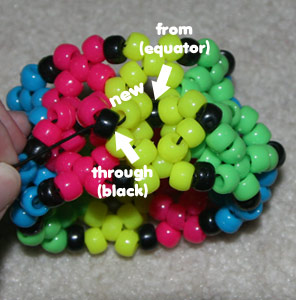 Step 11:Can you see how our next pyramid is going to be formed? Half of it will be yellow, and half of it will be pink. We now string two yellow beads, and thread from the black equator bead through the nearest black bead that's sticking up. Pull tightly. 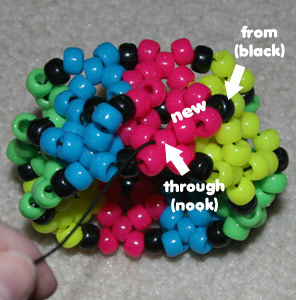 Step 12:To finish this yellow/pink pyramid, we need to string two pink beads, and thread from the black top-of-pyramid bead, through the nearest nook bead. The four corner points for this pyramid are two nook beads and two equator beads. These will be the corner points for the other pyramids you make. 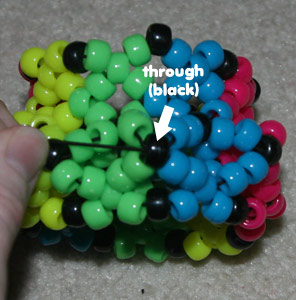 Step 13:Continue making the rest of the pyramids, remembering the rules below: - The corner points for each pyramid are two nook beads and two equator beads When you get to the end of the row, pull through the top black bead, and pull tightly.  Step 14:Next we need to make pyramids on the other half of the cuff. To do this, we first need to weave our string down to the nearest equator bead, as shown. 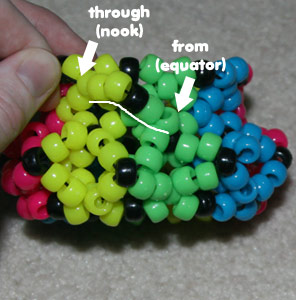 Step 15:Now we repeat the process we did starting at step 2, where we string 5 beads at a time. The beads we string first are green, green, black, yellow, yellow. This is because I am coming from an equator bead where the surrounding beads are green, and going through a yellow nook bead. 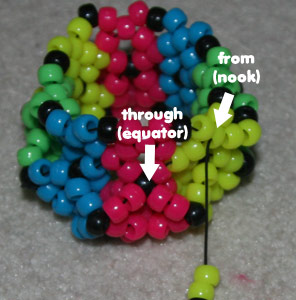 Step 16:The beads we string next are yellow, yellow, black, pink, pink because we're coming from a yellow nook bead, and going through an equator bead where the nearby beads are pink. Pull your string through the equator bead, and pull tightly. Step 17:Unfortunately my photos after step 16 are hard to see, so you're on your own for making pyramids for this half. But all you're doing is repeating steps 2 - 13, so refer back to those steps if necessary. |
Login / Register
Active Threads
- how do I secure the string on my kandi after finishing it?
- Perler charm ideas
- Anyone have suggestions for things for a bored kandi kid to do?
- Flat Panels with Mini Pony Beads
- Is there a way to fuse perlers without glue?
- ONLY FOR THE ALT PEOPLE What’s your Alt subculture?
- how do i make kandi ties?
- should I do a video walkthrough of all my kandi?
Random Pattern
