


| part | ||||||||||||||||||||||||||||||||||||||||||||
|---|---|---|---|---|---|---|---|---|---|---|---|---|---|---|---|---|---|---|---|---|---|---|---|---|---|---|---|---|---|---|---|---|---|---|---|---|---|---|---|---|---|---|---|---|
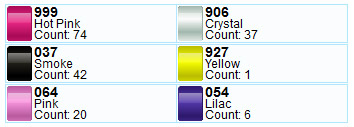
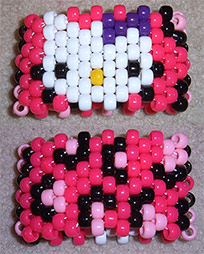 This tutorial will teach you how to make a Hello Kitty cuff kandi bracelet, and in the process you will also learn how to follow patterns, and how to make multi-stitch kandi cuffs in general. If you really want to learn how to follow kandi patterns, you will need to keep referring back to the pattern to understand why we start at the bead we do. Supplies you'll need: scissors, elastic string, 6x9mm pony beads in the colors shown below. This tutorial is copyright to Kirsty Forrester of kandipatterns.com and cannot be redistributed. These are the colors we will be using:
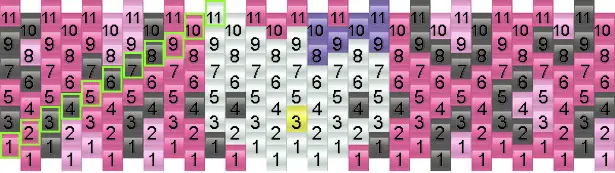
This is the pattern we will make the cuff from:
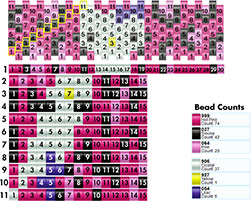
Click the image to the left to download a printable PDF of the pattern, bead rows, and bead counts. I strongly recommend you print this out and follow along if you want to fully understand how to read patterns. Basics of following kandi patterns:The pattern above is for a kandi cuff that's 30 beads around. Each numbered layer is a layer of the cuff. You'll notice that the first two rows of the pattern are both labeled "1." That's because when you start making your cuff, the first layer (which will just be a single stranded bracelet) will be composed of both of the "1" rows. It has to be this way so the single stranded kandi bracelet will be 30 beads around, not 15. You read the pattern from bottom to top (the columns), and left to right (the rows). However, as you work your way up the rows, you will not always start at the first bead in the row. You will start at the bead outlined in green on each row. If you make your cuffs in the exact same way as this tutorial, and your pattern has an even number of beads (like all the patterns on this site) this is the pattern your starting beads will follow:
Hopefully you can see how the pattern goes from there. Note that you shouldn't rely entirely on this chart, because it may not work for every single pattern, and it definitely doesn't work if you make the cuff in a different way, e.g. tie off after every row. You should keep checking your cuff with the pattern to make sure you're on track. But for this cuff, this chart does work. So looking at the pattern again...
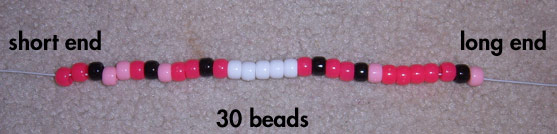
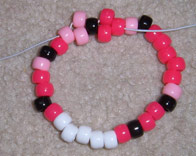
...these are the beads you will string for the first row:
Here are the two main rules to remember as you're making this kandi cuff:1) When stringing a new bead, skip a bead; don't string through the bead directly next to where you're coming from Starting Row 1
Cut a long piece of string - as long as you are comfortable working with. You can always tie on more later. Then string 30 beads in the order shown above, and move the long end of the string to the right hand side. 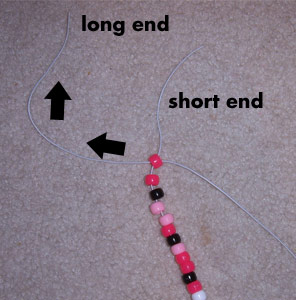 Step 2:Then, take the long end of the string, and pull it through the first bead at the end of the short end - the hot pink one.  Step 3:Pull the long end of the string tightly until the beads come together to form a single stranded bracelet. Your string should be coming out of a hot pink bead. Starting Row 2
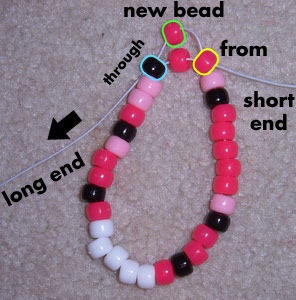 Row 2 - Bead 1So now we're on row 2. The first bead we'll string is a hot pink one. Why? Refer back to the bead chart and pattern. On row 2, we start at the 1st bead, outlined in green. That bead is hot pink. In the picture on the left, and future pictures, the bead highlighted in yellow is where our string is coming from, the green one is the new bead, and the blue one is the bead we're pulling through. So, string your hot pink bead, skip a bead, and pull through the black bead. 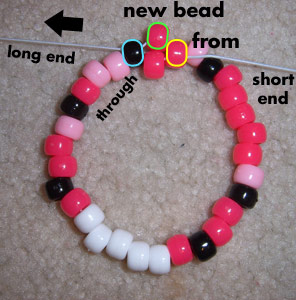 Then pull the long end of the string tight until the beads snap into place. Be careful not to pull too tight, especially if you are using plastic string rather than elasticated string. 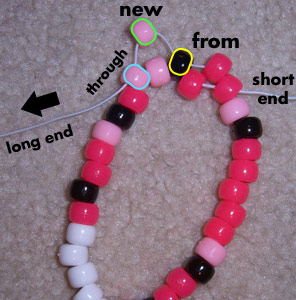 Row 2 - Bead 2The next bead we string is light pink. We're coming from a black bead, and stringing through another light pink bead. The bead that we skipped is light pink. Be sure to pull tightly after you string this new bead:
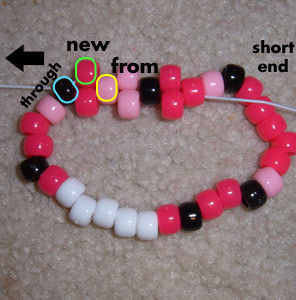 Row 2 - Bead 3The next bead we string is hot pink. We're coming from a light pink bead, stringing through a black bead. The bead we skipped is a hot pink one. 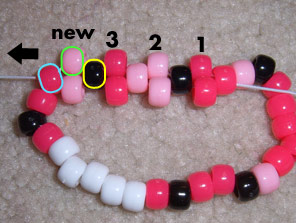 Row 2 - Bead 4The next bead we string is light pink. We're coming from a black bead, stringing through a hot pink bead. The bead we skipped is a light pink one. By this time I hope you get the idea of how to string beads. Continue the rest of the row yourself, using the chart below. Bead 5 is next. Remember to skip a bead. When you get to bead 15, I'll resume with the photos.
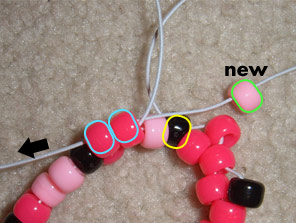 Row 2 - Bead 15Last bead of row 2! It's a light pink bead. We're coming froma black bead and going through two hot pink ones to complete the row. |
Login / Register
Active Threads
- how do I secure the string on my kandi after finishing it?
- Perler charm ideas
- Anyone have suggestions for things for a bored kandi kid to do?
- Flat Panels with Mini Pony Beads
- Is there a way to fuse perlers without glue?
- ONLY FOR THE ALT PEOPLE What’s your Alt subculture?
- how do i make kandi ties?
- should I do a video walkthrough of all my kandi?
Random Pattern
