| part |
|

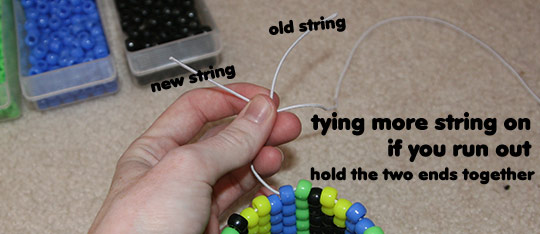
Adding more string if you run out
If you run out of string before you finish all the rows, don't worry. You can just tie more on :)
To do this cut a new piece of string, and hold it together with the old string, with the new string on top.
Then knot the ends together. Triple knotting is best, because you don't want to risk having the knot come undone.
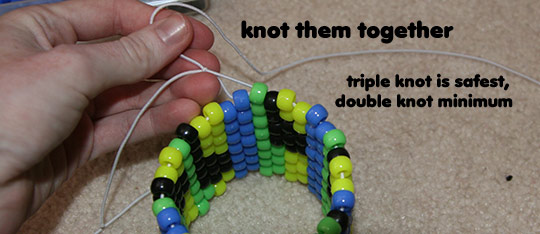
One you've triple knotted it, trim the excess string from the knot. Then, as you continue to add beads, pull the knot inside of a bead to hide it.

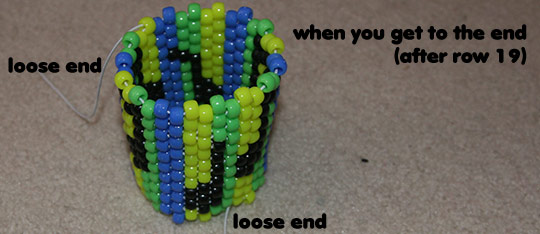
When you're finished - tying off the first loose end
When you have put on the last bead of the last row (row 19), your cuff should look like this, with two loose ends - one at the top, and one at the bottom.
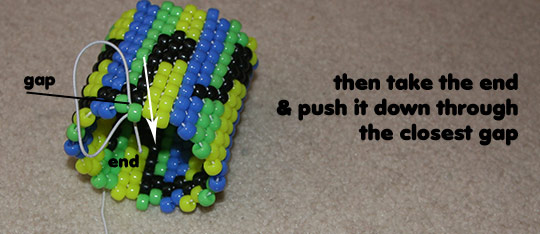
Take the loose end at the top of the cuff (you can tell which is the top because of the direction of the pattern) and pull it through two more beads. This is just to make sure the beads are as tight as they can be.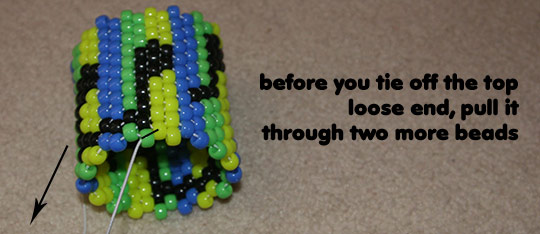
Then take the end, and push it down through the closest gap.
Then pull the end of string up through the loop you just made.

If you pull the end tightly (as far as it will go), you will make a knot. The photo below doesn't depict the knot, but you should know what it will look like ;D make at least one - preferably two - more knots using the same loop method.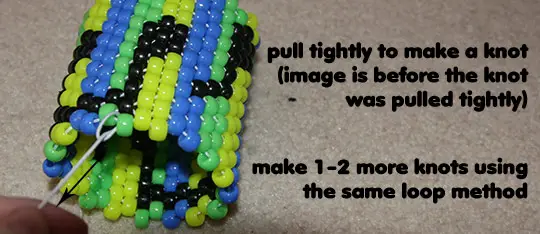
Once you've tied 2-3 more knots, you can cut off the excess string from the knot, and pull the knot inside the closest bead to hide it from view.
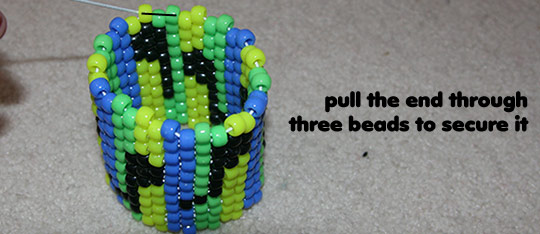
Tying off the bottom loose end
Now for the bottom end. The bottom loose end should be coming out of a yellow bead, and the yellow bead should be a bit wobbly since the string hasn't gone through any other beads.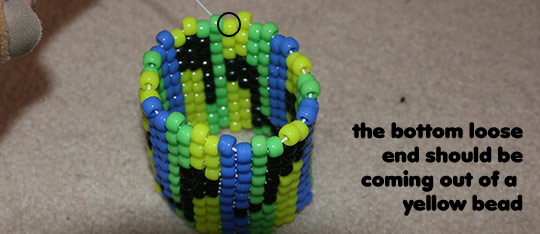
Pull the loose end through three beads to better secure it.
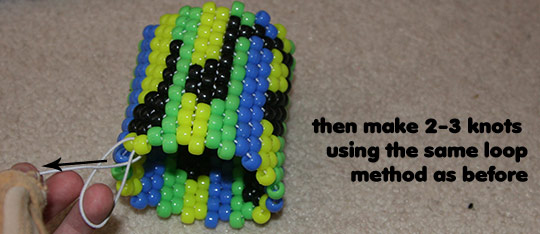
Then you can go ahead and tie 2-3 knots using the same loop method that you used for the top loose end.
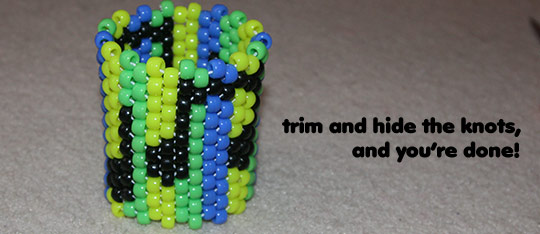
Trim the excess string from the knot, and pull it through a bead to hide it. Congratulations, you've finished the cuff :D
Get kandi patterns to make!
|
<p><img src="http://kandipatterns.com/images/tutorialpattern.gif" style="border: 0px none;" border="0"><br>
<br>
<a name="addingstring"><span style="font-size: 20px; font-weight: bold;">Adding more string if you run out</span></a><br>
If you run out of string before you finish all the rows, don't worry. You can just tie more on :)<br>
<br>
To do this cut a new piece of string, and hold it together with the old string, with the new string on top.<br>
<br>
<img style="" src="http://kandipatterns.com/images/29.jpg" border="0"><br>
<br>
Then knot the ends together. Triple knotting is best, because you don't want to risk having the knot come undone.<br>
<br>
<img style="" src="http://kandipatterns.com/images/30.jpg" border="0"><br>
<br>
One you've triple knotted it, trim the excess string from the knot. Then, as you continue to add beads, pull the knot inside of a bead to hide it.<br>
<br>
<img style="" src="http://kandipatterns.com/images/31.jpg" border="0"><br>
<br>
<a name="tieofftop"><span style="font-size: 20px; font-weight: bold;">When you're finished - tying off the first loose end</span></a><br>
<br>
When you have put on the last bead of the last row (row 19), your cuff should look like this, with two loose ends - one at the top, and one at the bottom.</p>
<p><img style="" src="http://kandipatterns.com/images/32.jpg" border="0"><br>
<br>
<br>
<br>
Take the loose end at the top of the cuff (you can tell which is the top because of the direction of the pattern) and pull it through two more beads. This is just to make sure the beads are as tight as they can be.<img style="" src="http://kandipatterns.com/images/33.jpg" border="0"><br>
<br>
<br>
<br>
Then take the end, and push it down through the closest gap.</p>
<p><img style="" src="http://kandipatterns.com/images/34.jpg" border="0"><br>
<br>
<br>
<br>
Then pull the end of string up through the loop you just made.</p>
<p><img style="" src="http://kandipatterns.com/images/35.jpg" border="0"><br>
<br>
<br>
<br>
If you pull the end tightly (as far as it will go), you will make a knot. The photo below doesn't depict the knot, but you should know what it will look like ;D make at least one - preferably two - more knots using the same loop method.<img style="" src="http://kandipatterns.com/images/36.jpg" border="0"><br>
<br>
<br>
<br>
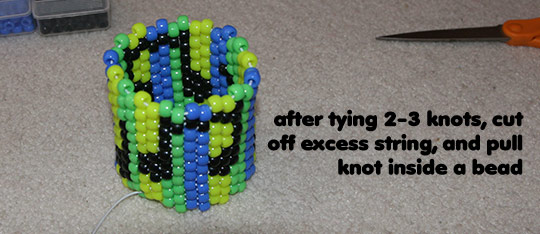
Once you've tied 2-3 more knots, you can cut off the excess string from the knot, and pull the knot inside the closest bead to hide it from view.</p>
<p><img style="" src="http://kandipatterns.com/images/37.jpg" border="0"><br>
<br>
<br>
<br>
<a name="tieoffbottom"><span style="font-size: 20px; font-weight: bold;">Tying off the bottom loose end</span></a><br>
Now for the bottom end. The bottom loose end should be coming out of a yellow bead, and the yellow bead should be a bit wobbly since the string hasn't gone through any other beads.<img style="" src="http://kandipatterns.com/images/38.jpg" border="0"><br>
<br>
<br>
<br>
Pull the loose end through three beads to better secure it.</p>
<p><img style="" src="http://kandipatterns.com/images/39.jpg" border="0"><br>
<br>
<br>
<br>
Then you can go ahead and tie 2-3 knots using the same loop method that you used for the top loose end.</p>
<p><img style="" src="http://kandipatterns.com/images/40.jpg" border="0"><br>
<br>
<br>
<br>
Trim the excess string from the knot, and pull it through a bead to hide it. Congratulations, you've finished the cuff :D<br>
<br>
<img style="" src="http://kandipatterns.com/images/41.jpg" border="0"><br>
<br>
<a href="patterns/"><span style="font-size: 20px; font-weight: bold;">Get kandi patterns to make!</span></a></p>


![Minecraft Disc [yellow]](https://s3.amazonaws.com/kandipatternspatterns/misc/1669075903_1669075810_1669075641_minecraft-disc-wh)
